This is Part Three of three. In this post, I'll outline how to use Form and Flow (aka Power Automate) to send an email to someone with our vcard attached. If you haven't created your vcard and uploaded it to a SharePoint library yet, please go back and read Part One and Part Two in the links below.
Part One - Create a VCard
Part Two - Upload VCard to a SharePoint Library
Create the Form
I created a basic form using MS Forms to capture the person's first and last name, email address, and company name. This step is pretty self explanatory as each entry is a text field someone can enter data in and click the 'Submit' button. I made the first name, last name, and email address mandatory fields so I can use them in the flow. Here's what my completed form looks like:
Create the Flow
At a high level, here is what the Flow does:
1. Take the data from the completed form.
2. Get the submitter's details.
3. Send an email from the submitter attaching their vcard from the Sharepoint library.
Here's what the Flow looks like:
1. Take the data from the completed form.
2. Get the submitter's details.
3. Send an email from the submitter attaching their vcard from the Sharepoint library.
Here's what the Flow looks like:
NOTE: I renamed the trigger and each action, but I will provide the names of each one I selected in the screenshots below.
Here is the Form trigger:

The Form action then goes to the first SharePoint action:
The first SharePoint Action goes to the second SharePoint action:
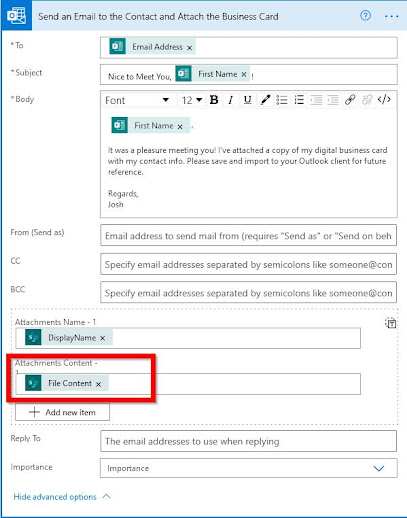
Lastly, the Email action sends the email:
Here is what the email action looks like. The highlighted box shows the 'Attachments Content' field that attaches the vcard to the email message.
When the Form is filled out and submitted, the Flow triggers and the email is sent with the vcard attached.
In your Outlook client, double click on the vcard to open it and then click the, 'Save and Close' button to save it in the Outlook client.
In your Outlook client, double click on the vcard to open it and then click the, 'Save and Close' button to save it in the Outlook client.
The vcard can be imported into the Contacts App on either an Android or iPhone. Here's what that looks like on an Android:
First, click the '...' next to the attached vcard. Under, 'Save To,' click 'Device.'
Next, once the vcard has been downloaded, swipe down from the top of the screen and select the file.


0 Comments