My department had an initiative this year to clean up our on premise Exchange environment. Any mailbox that did not have a reason to stay on premise was migrated to Exchange Online.
One mailbox in particular was utilized by our E-Fax service. When an incoming fax was sent to the mailbox, a PowerShell script copied the email attachment to a NAS share. The process is outlined below:
One mailbox in particular was utilized by our E-Fax service. When an incoming fax was sent to the mailbox, a PowerShell script copied the email attachment to a NAS share. The process is outlined below:
That's exactly why Power Automate with a Data Gateway connection works well for this use case. I can create a Flow that leaves the existing NAS share and all permissions in place.
The new process is outlined in the diagram below:

Pre-Requisite
M365 Licensing is required to use the Data Gateway feature. This article explains licensing needed. The account used in this article has a M365 E3 license.
Data Gateway Install
I decided it would be easier to install the Data Gateway first and then build the Flow. The Data Gateway install is documented, but I'll include what I did here along with an issue I found while making the connection to the NAS.
First, within Power Automate, click on 'Data' then 'Gateways' on the left navigation menu:
First, within Power Automate, click on 'Data' then 'Gateways' on the left navigation menu:
Next, in the 'Gateways' page select the '+ New Gateway' button:
The Data Gateway Downloads Page will open. Select the 'Download' button for the On-Premises Data Gateway.
Run the installer and specify the install location (default is fine). Click the 'Install' button the gateway installation takes around three minutes.
Once the install is complete, the gateway will need to register to Power Automate. The account must be licensed in O365 and used for sign-in. Click the 'sign-in' button after entering the account name.
If this is a new gateway on the machine, leave the default selected and click the 'Next' button.
Provide a name and recovery key and click the 'Configure' button. Note - the recovery key can include upper and lower case letters along with numbers and symbols.
That should be all that is needed to create the gateway on the machine. A confirmation winodw will appear showing it has been successfully created and can be closed by clicking the 'Close' button on the bottom.
Confirm the gateway is running on the machine by finding it listed under 'Programs and Services':
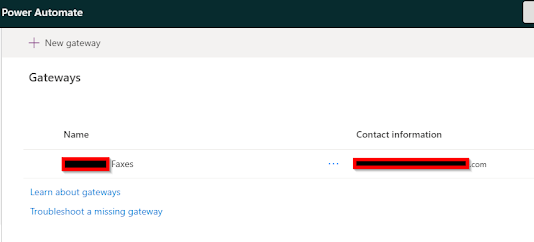
The Data Gateway is now active in Power Automate:

Last, but not least, make the connection to the NAS using the 'File System' connector in Power Automate.
In the Power Automate navigation menu, under 'Data' select 'Connections':
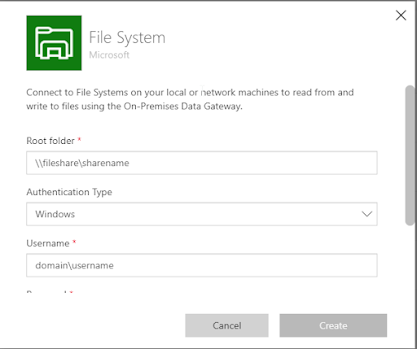
Within Connections, search for 'Microsoft FileSystem' and select it to create a new file system connection:
Remember the 'issue' mentioned earlier? It comes in this step. Make sure to include 'domain\' in front of the username or else it won't connect to the file system. In addition, verify the account used has permission to the folder within the folder security permissions (note: it will need 'modify' permission to save files).

Scrolling down on this window, input the account password and select the gateway connection we created in the previous steps and click the 'Create' button when finished.
The File System connection will now show active under 'Connections':
The Flow isn't too complicated, but I'll cover each step.
Start by checking for the email with an attachment. Set the 'Include Attachments' drop down to 'Yes.'
If the condition statement evaluates to True (i.e. it finds a checked attachment type), then it saves the attachment to the NAS share. If the statement evaluates to False then nothing is done since the attachment should not be saved to the NAS share.


0 Comments