1.
Overview
This guide will walk thru creating
and installing a custom Skype Room System installation image on a Surface Pro
4. There is an optional section for the creation of a custom theme as well.
2.
Pre-Requisites
a.
Hardware
The official hardware requirements can be found in this
article. For my deployment, I have a Surface Pro 4 with a Core i5
processor, 4 gb RAM, and 128gb disk. The article mentions using a bootable USB
key that’s at least 32gb. However, I created the install media on a 16gb key
without issue. My SP4 plugs into a Logitech SmartDock
for additional power and USB ports. I recommend using a USB keyboard and mouse
to perform the on-screen setup once the install media is finished installing.
b.
Software
Here is a list of files and their locations that I used to create the
install media. Throughout this process, I found this to be the most confusing
part with the small bit of documentation I found online:
File Name
|
Link
|
MSU for KB4056892
|
|
SRS Media Creation Script
|
|
SRS Deployment Kit
|
|
Surface Pro 4 Drivers*
|
|
Win 10 Enterprise Build v1709
|
None – Purchase a licensed copy
|
*In my case, I needed the ‘SurfacePro4_Win10_16299_1801701_1.msi’ file,
specifically.
Put all of these files into the same directory before running the
SRS Media Creation Script from a PowerShell window.
c.
Accounts
Depending on the type of deployment (hybrid, online, on-prem), these
guides will walk thru how to create and configure the account needed.
3.
Build Process
a.
Media Creation Script
As I mentioned in step 2B, make sure all the files needed to create the
install media are in the same the folder. Plug in a FAT32 file-system formatted
USB key into the machine creating the install media. Once the USB key is
recognized by the machine, run the ‘CreateSRSMedia.ps1’ script from PowerShell
as an administrator.
The script will prompt multiple times for input:
1.
First prompt: What type of customer are you? OEM
or Enterprise. I typed, ‘Enterprise’ and hit enter.

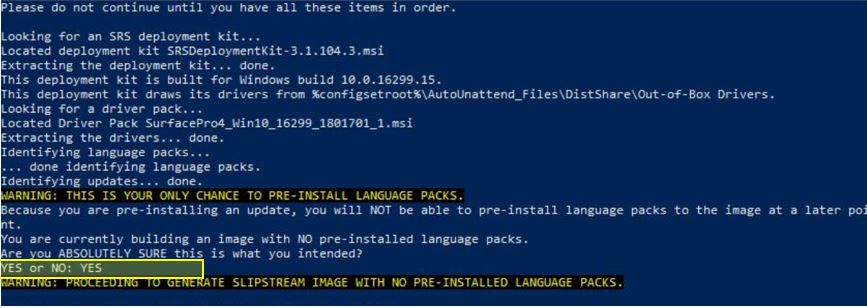
2. Second prompt: You are currently building an image with NO pre-installed language packs. Are you ABSOLUTELY SURE this what you intended? Type ‘YES,’ and don’t worry because the build will include its own language packs.
3.
Third prompt: Drive letters to create the
install media on will be listed. In my case, the USB key was listed as option
‘0’ drive E:\, so I type ‘0’ and hit enter.
4 . Fourth prompt: Enter the root path of your Windows Install Media. Mount the Win 10 Enterprise iso by double clicking on it. In my case, double clicking the file created drive ‘F:\’ so I typed in ‘F:\’ for this prompt and hit enter.

After the fourth prompt, the media creation script will run and output its progress in your PowerShell window. It took me roughly 1-1.5 hours for the script to finish, so feel free to get something to eat, get coffee, etc., but make sure the script can still run in your absence.

b . Installing Media from USB
Shut down the Surface Pro 4 and
connect the AC adapter to power. Next, take the install media created on the
USB key in step 3a and plug into the Surface Pro 4. Hold the volume down key on
the SP4, then hold and release the power button. The SP4 will boot into the
boot selection menu. Modify the boot order so it boots off the USB key. Press
the volume down key to navigate to the boot order, then select the USB to
change the order. Save the boot order before allowing the device to boot off
USB.
The SP4 will run thru the install
media on its own and power down once it is done. Once it’s powered down, remove
the USB key and plug it into a docking station (ex: Logitech SmartDock). When
SP4 is powered on, it will walk thru selecting a language and logging into S4B
with the account created in step 2c. If any devices are hooked up as part of
your SRS (ex: phone, mic, camera) then select each of those devices to use for
audio, video, etc.
c.
Installing a Certificate
I had issues with the S4B account signing in because the SP4 needs a
certificate installed. When the SRS is installed, two accounts are created on
the device. The ‘Skype’ account runs the SRS application that powers the room
system functionality. The ‘Administrator’ account is a local admin account that
allows a login to the Win 10 machine running on the backend. Login to the Win
10 machine to install the certificate.
On the SRS home screen, select the gear icon in the bottom right hand
corner of the screen and select ‘Settings’. Login with the Administrator
account password which is ‘sfb’ by default. Once logged in, select ‘Windows
Settings’ on the left side of the screen and then click on the ‘Windows
Administrator Login’ button on the right side. Select the ‘Administrator’
account on the Win 10 login screen and enter the default password again to sign
into Win 10. I accessed the internal CA certsrv site for my organization via a
web browser and downloaded the certificate chain to the root and intermediate
cert stores.
Sign out of the Win 10 machine Administrator account. The Win 10 login
screen will appear, and then select the Skype account to restart the SRS
application. The Skype account will auto-login once selected.
4.
Custom Theme (Optional)
My organization wanted the company logo to
appear in the background of the main display screen. The screen background is
known as a ‘theme’ and can be adjusted from the device. Select the gear image
in the bottom right hand corner of the SRS screen and then choose ‘Settings,’ then
login with the default admin password (password: sfb) and select ‘Theming’. The
‘custom’ theme will be modified to set the background image as the company
logo.
There’s an excellent
post from Tobie Fysh on the requirements to create a custom theme. Tobie
graciously includes his own XML and image files as an example of what needs to
be uploaded.
To hit a few highlights of the article,
make sure to do the following:
1. Set the image size to 3840x1080.
1. Set the image size to 3840x1080.
2. Upload the XML and image file to C:\Users\Skype\AppData\Local\Packages\Microsoft.SkypeRoomSystem_8wekyb3d8bbwe\LocalState.
3. DO NOT change the text in the
<ThemeName> tag to something other than ‘Custom’ and make sure to include
the full path to file in the <CustomThemeImageURL> tag (ex: C:\Users\Skype\AppData\Local\Packages\Microsoft.SkypeRoomSystem_8wekyb3d8bbwe\LocalState\your_image_name.jpg).
4. After uploading the XML and image file,
reboot the device so it will pick up the new custom theme.


8 Comments
On the Fourth prompt I entered F:\ but the system is saying:
ReplyDelete"Get-WindowsImage : There is no matching image"
Any Idea why I'm getting this error ?
Chris,
ReplyDeleteWhen you double click on the .iso it mounts the image to a drive letter. In my case, that letter was 'F:\,' but this may not be the same for you.
Your best bet is to open file explorer on your PC and see what drives are mounted when you click on 'This PC' on the left side of the screen.
The Surface Pro4 doesn't want to boot from USB device. The USB has 7 Folders and one AutoUnattend.xml and one RecoveryTool.ps1 file. Is this normal? Thank you in Advance!
ReplyDeleteI had to make a WinPE drive. Boot WinPE, insert the Win10image, start Setup.exe - it worked.
DeleteOnce I enter Enterprise, it validates the signature for srsdeploymentkit successfully. Then I receive a very long error that starts with:
ReplyDeleteConvertFrom-Json : Invalid object passed in, ':' or '}' expected. (1982): {
"MinimumCreateSrsMediaVersion":"1.4.0",
"RequiredUpdates":{
"KB4340917":"http://download.windowsupdate.com/d/msdownload/update/software/updt/2018/07/windows10.0-kb4340917-x64_ed5f586fa9d7064d61e45c523f20ba7fc1ff142a.msu"
I have the MSU for KB4340917 in the directory with the CreateSRSMedia script. Any idea's?
In the newest release of the script it downloads all required files for you besides the copy of windows itself. Seems I was getting this error because I had downloaded the files already and had them in the same directory as the script.
DeleteHello, Im trying to configure a Surface Go as the the Teams meeting room device. Do I need the Smart Dock for it to prompt for the Teams login? I can access the admin and Skype users but am not being prompted for anything else. I am however, connected to a Surface Dock, which I wanted to use instead.
ReplyDeleteHi, I run into the same issue. Everything was working, but I could not finish the wizard because there is no dock for the Surface Go.
DeleteDid you found a workaround?
RoPa